Data Deduplication is a storage method that eliminates redundant data to free storage space. The redundant data are replaced by a pointer to the data. So in this topic I apply this method on my VMM Library that takes a lot of disk space on my lab storage (ISO, VHDX and so on).
Requirements for Data Deduplication
The below information are taken from this MSDN topic.
Data deduplication is supported only on the following:
- Windows Server operating systems beginning with Windows Server 2012
- NTFS data volumes
- Cluster shared volume file system (CSVFS) supporting virtual desktop infrastructure (VDI) workloads beginning with Windows Server 2012 R2
Deduplication is not supported on:
- System or boot volumes
- Remote mapped or remote mounted drives
- Cluster shared volume file system (CSVFS) for non-VDI workloads or any workloads on Windows Server 2012
- Files approaching or larger than 1 TB in size.
- Volumes approaching or larger than 64 TB in size
Deduplication skips over the following files:
- System-state files
- Encrypted files
- Files with extended attributes
- Files whose size is less than 32 KB
- Reparse points (that are not data deduplication reparse points)
Install Data Deduplication service role
To install the Data Deduplication service role, run as Administrator a PowerShell console and execute the below command:
Add-WindowsFeature -name FS-Data Deduplication
Enable the Data Deduplication
On my VMM library servers, I have a D: volume where I store ISO, VHDX and so on. So I will enable the Data Deduplication on this volume.
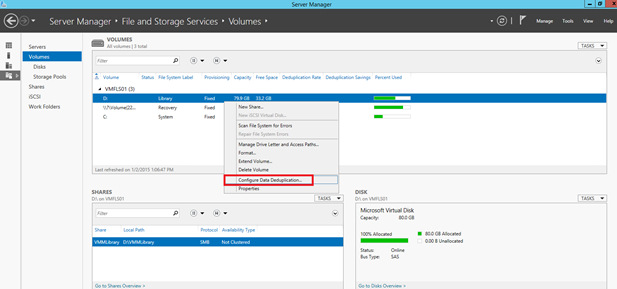
To enable it, open the Server Manager and navigate to File Servers and Volumes. Right click on the volume where you want to enable the Data Deduplication and select Configure Data Deduplication.
Next select Data Deduplication for General purpose file server. Then you can choose to exclude files from the deduplication process. Next select Set Deduplication Schedule.
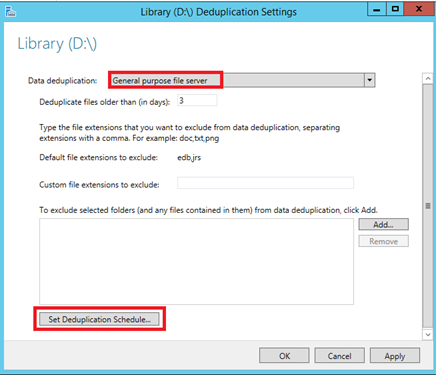
Next I enable background optimization to run Data Deduplication at low priority. However I enable also the throughput optimization to run the deduplication at normal priority on schedule.
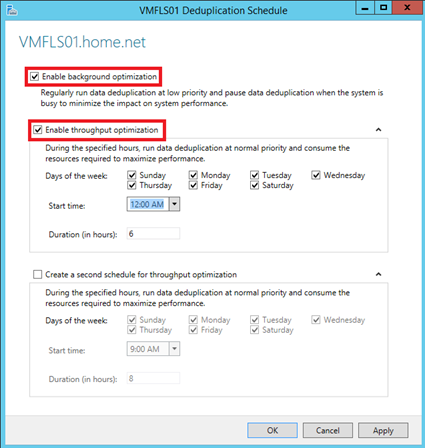
To enable and schedule the Data Deduplication as above, you can run the below PowerShell script.
enable-dedupVolume "D:"
New-DedupSchedule
			-Name "ThroughputOptimization" `
                        -Type Optimization `
                        -DurationHours 6 `
                        -days Mon, Tues, Wed, Thurs, Fri, Sat, Sun `
                        -Start 12:00am
Run the Data Deduplication process
With the above configuration the Data Deduplication is running at low priority. To run at normal priority the deduplication process, you can wait the schedule or you can run the below command:
start-dedupjob D:\ -Type Optimization
You can get the Deduplication status with this command:
Get-DedupStatus

You can also get this report from the Server Manager.
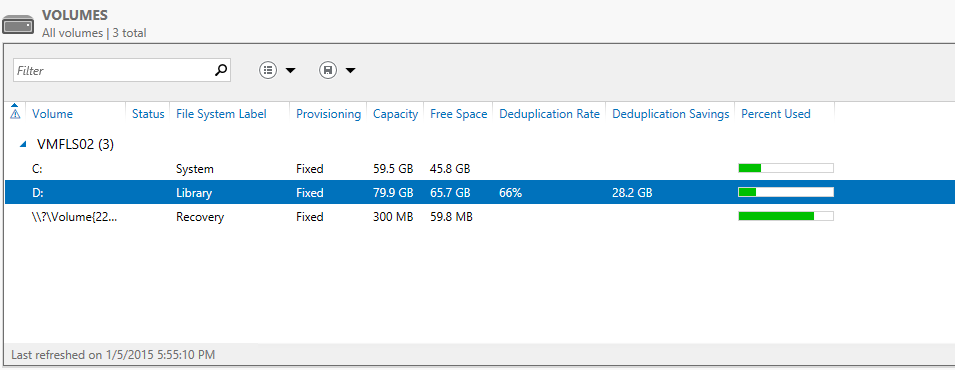
Compact the VHDX
If you use a Dynamic VHDX and you want to save space onto the VHDX storage, you can compact the virtual hard disk. However to optimize the VHDX, the related VM must be shutdown. So I run this small script to stop the VM, compact the disk and start again the VM.

$VMName      = "VMFLS02"
$VHDName     = "VMFLS02-LIB"
$VMObj = Get-VM $VMName
Write-Host "Stopping $VMName virtual machine"
Stop-VM $VMObj
$VHDX = Get-VHD -VMID $VMObj.id | Where-Object {$_.Path -like "*$VHDName*"}
if ($VHDX.VHDType -notmatch "Dynamic"){
    Write-Host "Your VHDX type is not dynamic. Can't optimize disk"
    Exit
    }
Else{
    Write-Host "Optimizing $(($VHDX.Path))..."
    Optimize-VHD $VHDX.Path -Mode Full
    }
Write-Host "Starting $VMName virtual machine"
start-VM $VMObj
Before running the above script, the VHDX size was 56,8 GB.
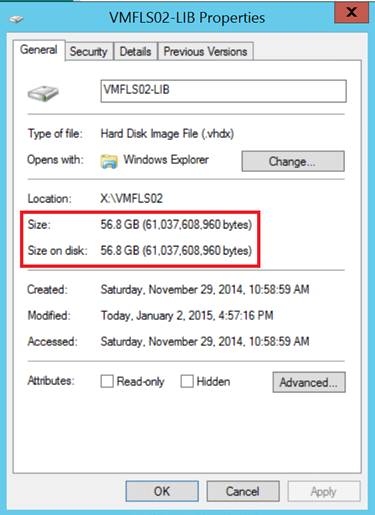
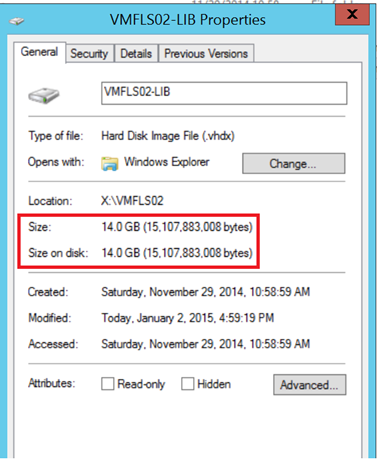
After the VHDX compacting, the disk usage is 14GB. My lab storage says “Thank you :)”.
