If you are using Microsoft Azure, you may have noticed that currently there are two Portals:
- Standard Azure Portal: https://manage.windowsazure.com
- Preview Portal: https://portal.azure.com
The Standard Azure Portal is based on the REST API called Service Management while the Preview Portal is based on Azure Resource Manager (ARM). Microsoft introduces ARM to simplify the deployment in their Public Cloud thanks to reusable template written in JSON. We will see in the next section that this template is declarative and describes the resource and its properties that you want to deploy. So it is easy to deploy your development, validation and production environments with the same template. It enables to avoid mistakes and configuration drift. To finish, these templates will be reusable in the AzureStack solution. With ARM and template, you enter in the DevOps worldJ.
This topic is not intended to teach you everything about the Azure Resource Manager template. I write this topic to make a quick overview. To go in deep, I recommend you to check links referenced in the documentation section.
Documentation
Before getting to the heart of the matter, I want to share with you some resources that may interest you:
- Authoring Azure Resource Manager Templates by Tom FitzMacken
- Cloud Consistency with Azure Resource Manager by Kristian Nese
- Azure Resource Manager DevOps Jump Start by David Tesar and Kevin Lam
Recommended stuff
Nothing is mandatory to create and edit your JSON template. But some software can ease your life. However to deploy resources in Azure, you need an Azure subscription. Below you can find the recommended software:
- Azure PowerShell module: it enables to control Azure Resource by using PowerShell. You can download it here;
- Visual Studio 2015: I use Visual Studio 2015 Community. It is an Integrated Development Environment (IDE). You can download it here;
- Azure SDK for .NET: It is the development kit for Microsoft Azure. Be sure to download Azure SDK for Visual Studio 2015. You can download it here.
Azure Resource Manager template
Structure
The template structure looks like this:
{
 "$schema": "https://schema.management.azure.com/schemas/2015-01-01/deploymentTemplate.json#",
 "contentVersion": "",
 "parameters": { },
 "variables": { },
 "resources": [ ],
 "outputs": { }
 }
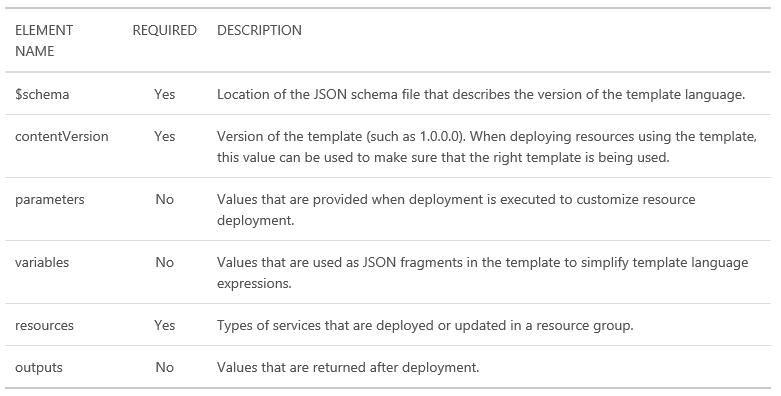
In the below table, you can find the description of each part of the JSON structure. This table comes from Authoring Azure Resource Manager Templates topic.
Parameters part
In the parameters part, you define which settings will be asked to users when the deployment will be executed. Below you can find an example of a simple parameter:
"StoAccountName": {
        "type": "string",
 }
This parameter is called StoAccountName and its type is a string. When the deployment will be executed, the user will be asked to set the StoAccountName parameter. You can add a default value for this parameter as below. However, if you specify another value during deployment, the specified value will replace the defaultValue.
"StoAccountName": {
       "type": "string",
       "defaultValue": "techcoffeevmsto",
}
To finish you can specify a list of allowed values by using allowedValues. You may have noticed that in the below example, the allowed values are between brackets because it is a table.
"StorageAccountType": {
        "type": "string",
        "allowedValues": [
            "Standard_LRS",
            "Standard_GRS",
            "Standard_ZRS"
        ]
}
The allowed parameter types are:
- String
- SecureString (usually for password)
- int (Integer)
- bool (Boolean)
- object
- array
You can create a file that contains values of each parameter to avoid to specify them each time you execute a deployment. Below this is an example of a parameter file:
"$schema": "https://schema.management.azure.com/schemas/2015-01-01/deploymentParameters.json#",
    "contentVersion": "1.0.0.0",
    "parameters": {
        "StorageAccountType": {
            "value": "Standard_LRS"
        },
        "VirtualNetworkName": {
            "value": "TechCoffeevNet"
        },
        "StoAccountName": {
            "value": "techcoffeevmstorage"
        }
    }
}
To call a parameter in the JSON template, you can use parameters(‘<ParameterName>’).
Variables part
Variables are used to simplify the readability of the template and to reuse several times a same value but specified one time. You can use parameters to construct variables. Below some examples:
"VMWEBImageOffer": "WindowsServer",
"VMWEBOSDiskName": "[concat(parameters('VMWEBName'), '_OSDisk')]",
"ResourcesLocation": "[ResourceGroup().location]"
VMWEBImageOffer is a variable that containing WindowsServer string.
VMWebOSDiskName variable contains a concatenation of the value of the VMWEBName parameters and the string _OSDisk. For example, if VMWebName parameter is VMWEB01, the VMWEBOSDiskName variable contains VMWEB01_OSDisk.
To finish ResourcesLocation contains the location of the resource group where the resources will be deployed.
You can call a variable in the JSON template by using variables(‘<VariableName>’).
Resources part
In this part you define the resource that will be deployed in Microsoft Azure (Virtual Machines, vNICs, Storage Accounts and so on). If the object already exists, it will be updated with the settings specified in the template.
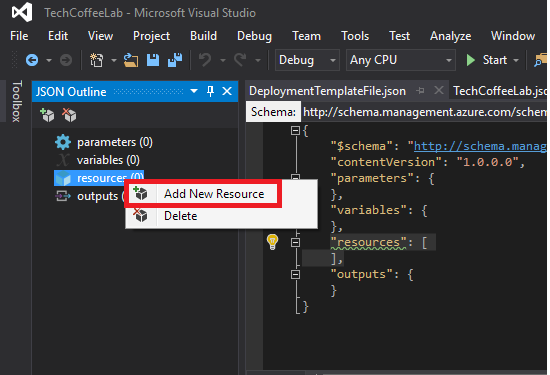
I really recommend you to use Visual Studio with Azure SDK because you can add a resource to the template with some clicks. When you have created an Azure Resource Group Project (Templates, Visual C# and Cloud), right click on resources in the JSON Outline and click on Add New Resource.
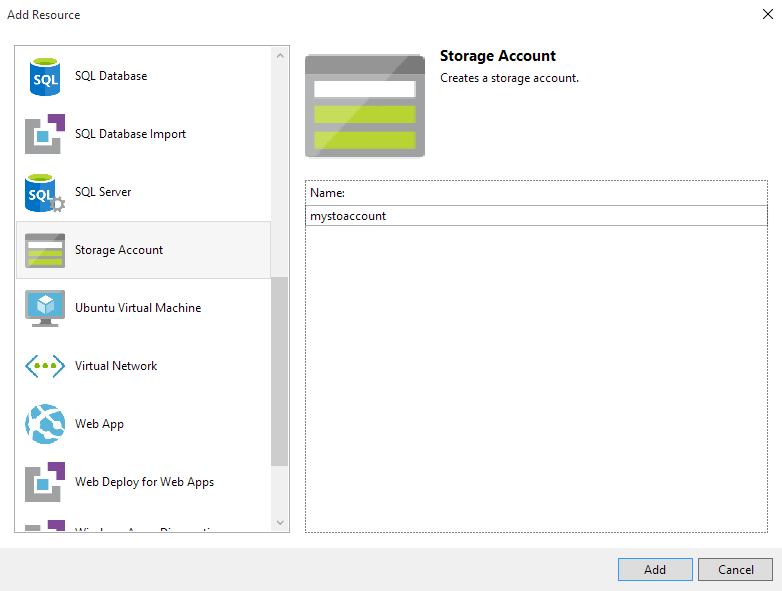
Select the resource that you want to add and click on Add. For example, below I add a Storage Account:
When you have clicked on add, you should have additional parameters, variables and resources as below:
{
    "name": "[parameters('mystoaccountName')]",
    "type": "Microsoft.Storage/storageAccounts",
    "location": "[parameters('mystoaccountLocation')]",
    "apiVersion": "2015-05-01-preview",
    "dependsOn": [ ],
    "tags": {
           "displayName": "mystoaccount"
     },
     "properties": {
           "accountType": "[parameters('mystoaccountType')]"
     }
}
Now you just have to change the properties of the resource group with your variables and parameters and the resource configuration is finished!
Make a loop
I know that I said earlier that I will not go deep in this topic, but I think loops are important to simplify your template. Loops enable you to declare one time a resource and make several deployments of this resource. For example, you can declare once a time a Virtual Machine and make a loop to create several instances with the same settings.
To make a loop, first you should create an integer parameter as below:
"WebInstanceCount": {
        "defaultValue": "2",
        "type": "int"
}
Now I’ll take an example of creating several vNICs by using a loop.
{
       "name": "[concat('vNIC_', parameters('VMWEBName'), copyindex(1))]",
       "type": "Microsoft.Network/networkInterfaces",
       "location": "[variables('ResourcesLocation')]",
       "apiVersion": "2015-05-01-preview",
        "copy": {
            "name": "VMWEBNicLoop",
            "count": "[parameters('WebInstanceCount')]"

        }
}
First, you can see copy element that enables to specify a loop name and a counter. So in count element, I specify my parameter WebInstanceCount that has a default value of 2. So two vNIC will be created by using this loop.
Now I want to get the counter index to name my vNIC (to name them vNIC1, vNIC2 and so on). So I use copyindex() function. You can find it in the above example in the name element. The number 1 specified in the copyindex() function enables me to shift the index by 1. I do that because the index start from 0 but I don’t want a vNIC called vNIC0. So I have shifted the index by 1 to start from vNIC1.
Deploy the template
You can deploy the template directly from Visual Studio, by using PowerShell or from the Azure Marketplace (template deployment).
Deploy from Visual Studio
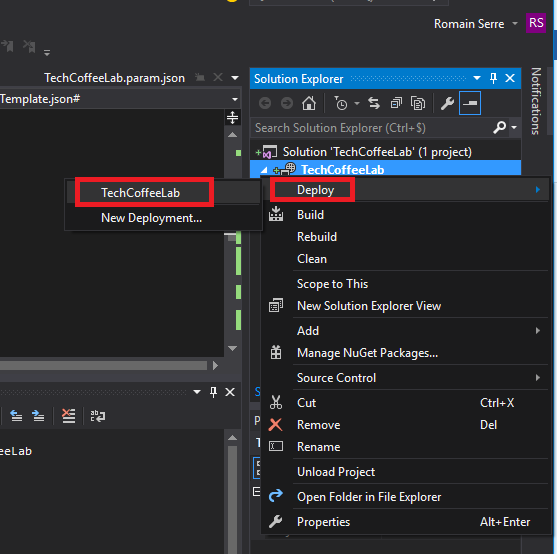
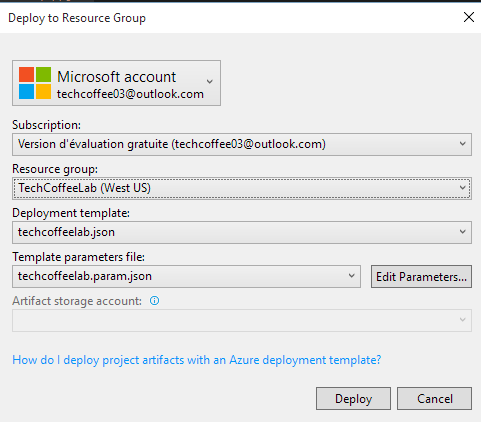
To deploy your resource from Visual Studio, right click on your project and select Deploy.
Next, select your account, your subscription and so on. You can fill automatically your parameter files by clicking on Edit Parameters.
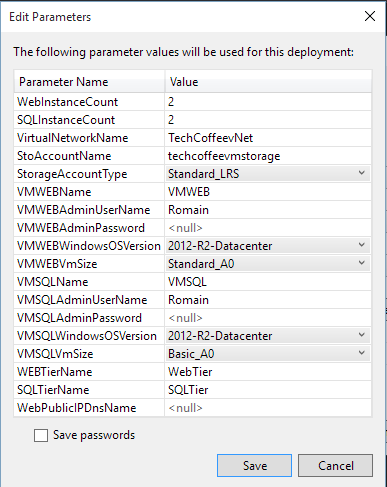
In Edit Parameters, you can specify the parameter values. When you have specified the AllowedValues element in parameters, you have a drop-down menu instead of a field.
Deploy from Azure Portal
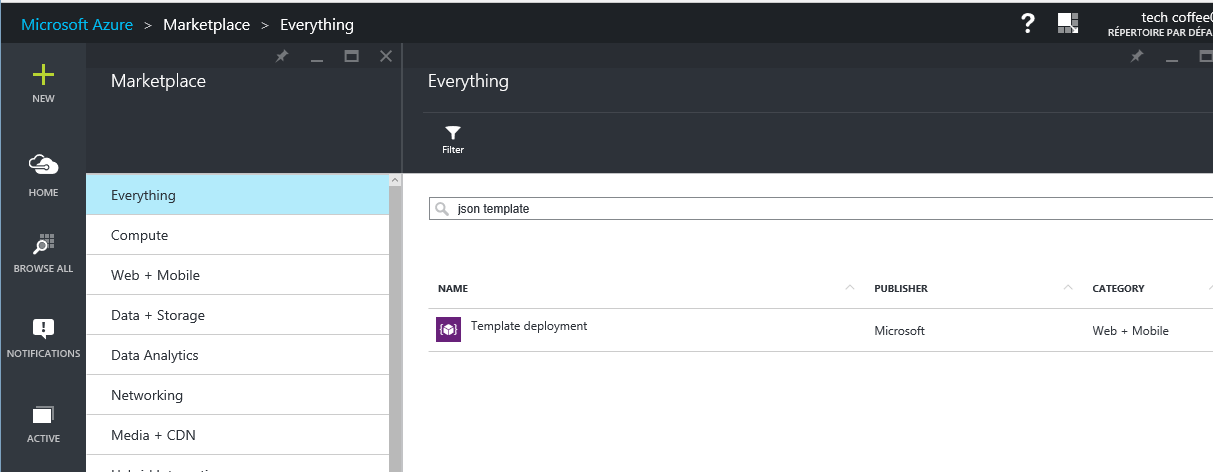
You can also deploy the JSON directly from the Azure Portal. Navigate to the marketplace and find template deployment.
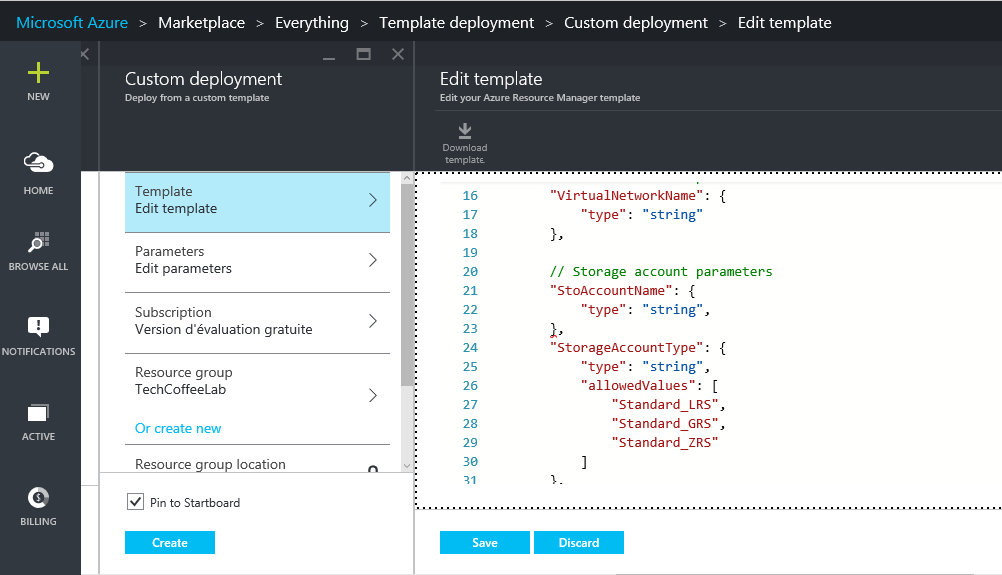
Now you just have to past your JSON template and set the parameters, the resource group and so on:
Deploy from PowerShell
Here is my favorite method. You can deploy the template from PowerShell by using the New-AzureResourceGroup cmdlet. First connect to your subscription.

Next run the following command:
New-AzureResourceGroup -Name TechCoffeeLab `
                       -Location "West US" `
                       -DeploymentName TechCoffeeDep `
                       -TemplateParameterFile C:\temp\TechCoffeeLab.param.json `
                       -TemplateFile C:\temp\TechCoffeeLab.json `
                       -verbose
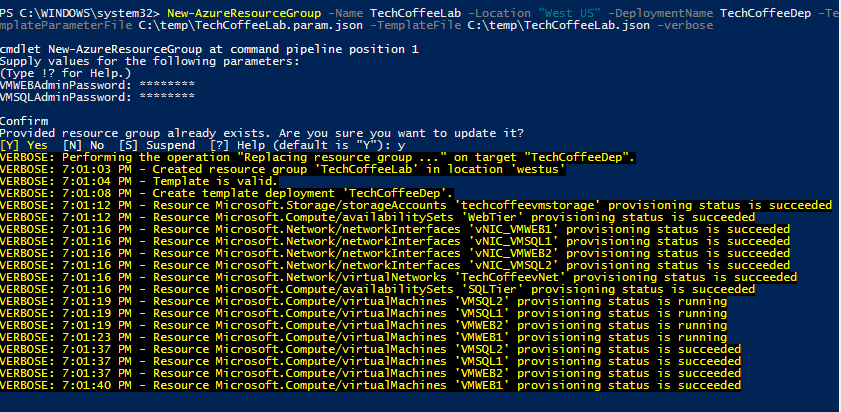
You can find my JSON files on my GitHub repository: https://github.com/SerreRom/TechCoffee
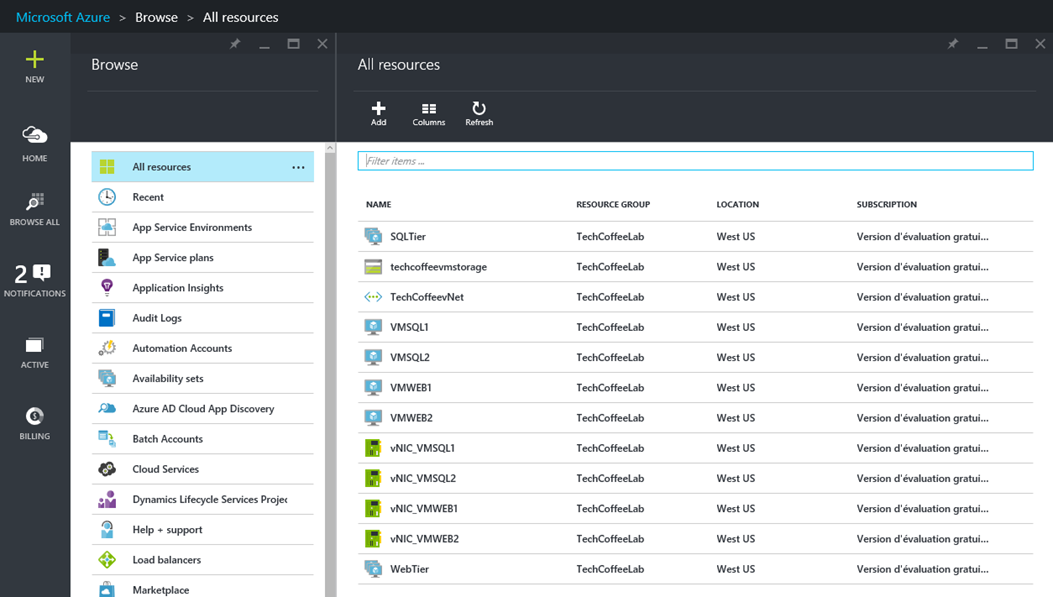
Now that the deployment is finished you can open your Azure Portal to see your resources deployed:
Conclusion
This topic presents you a quick overview of the Azure Resource Manager Template. To go in deep, I recommend you to check links referenced in the documentation section. As you have seen in this topic, template enables to make consistent deployments, even if you have several environments as testing, validation and production. Moreover, you can update quickly some settings just by changing the values in the template. To finish you can leverage on Azure VM Extensions to configure your Virtual Machines as you want (run scripts, Desired State configuration and so on) during the deployment. And JSON template will be compatible with Azure Stack J.


Hi Romain, Thanks for the good article.
You have created VMs and Availability sets separately but missed to add the VMs in Availability sets.
The VM section of the template should be like:
“dependsOn”: [
……
“[concat(‘Microsoft.Compute/availabilitySets/’, parameters(‘WEBTierName’))]”
],
( and )
“availabilitySet”: {
“id”: “[resourceId(‘Microsoft.Compute/availabilitySets’, parameters(‘WEBTierName’))]”
},
Thanks,
Raj
Hi Raj,
Thank you for the correction. I’ll make the modification in the GitHub this week-end.
Have a nice day.
Romain.